I have been asked many times how to add multiple pages to a Silverlight file using Expression Blend. Probably the easiest way to do this is to use the Frame Control and the HyperlinkButton.
A Frame control acts as a window that can display other pages within a project. In this example you will see how the pages you will create can be displayed in a Frame using the HyperlinkButton Control. For this tutorial you can download the lesson files and follow along. The lesson files include images files that you will add to new pages in your project.
- Start the new project by Opening Expression Blend (I am using version 4) .
- If the Intro screen appears choose to Close it.
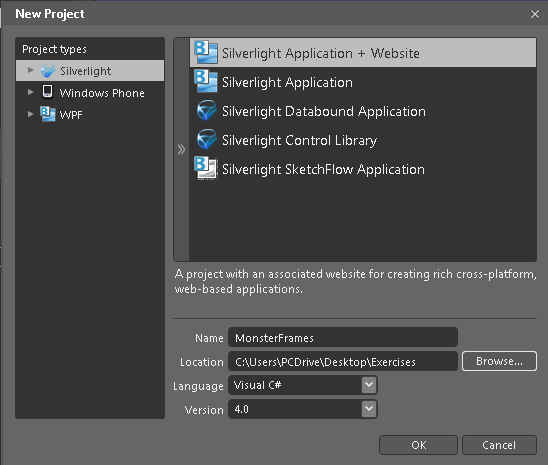
- Select File > New Project. Select Silverlight > Silverlight Application and Website.
- Name your file MonsterFrames and save it in a location that is convenient for you. And press OK.
Adding existing art to your project
You can add existing art to your project. Even though you can use the File menu to import native Illustrator and Photoshop files, I will be demonstrating how to import existing artwork into your project that are in the .png or jpeg format. GIFs cannot be imported into Expression Blend. Before adding artwork, it is a good idea to prepare a location in your Project folder.
- Locate the Projects tab. In the default workspace this will be in the upper-left of the Expression Blend workspace. If you do not see it, select Window> Reset Current Workspace. If it is STILL not there select Window > Workspaces > Design.
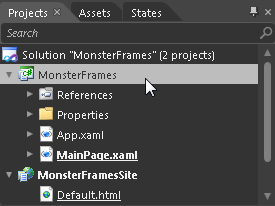
- In the Projects panel select the MonsterFrames folder, as you want to make sure the new folder you are creating lands within this folder.
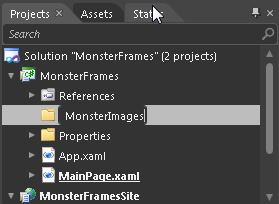
3. Select the Project Menu item and choose Add New Folder. When the folder appears, name it MonsterImages.
4. With the folder still selected choose the Project menu item and select Add Existing Item. When the Browse window appears Navigate to the MonsterImages folder that you downloaded and select all the images. Press Open. The images are added to the MonsterImages folder in your project.
Important! Select the MonsterFrames folder at the top of the Projects panel next. You will be creating new pages in your project, and you will not want them to be placed in the MonsterImages folder.
Creating additional pages in your Project
In this next part of the tutorial, you will make some simple pages that contain images. These pages will be used to show how you can navigated from page to page using the Frame control.
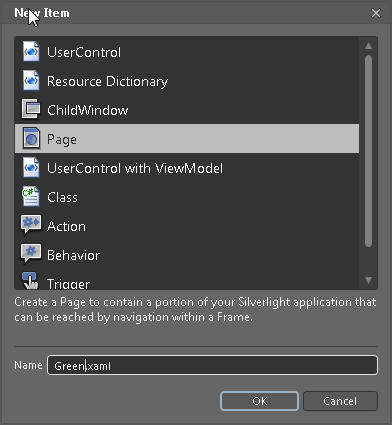
1 With the MonsterFrames folder still selected in the Projects panel, select File > New Item. When the New Item window appears select Page, name the page Green.xaml, and then press OK.
Note that if you do not rename this file the navigation does not work.
2 The new page appears, and the Layout Grid is transparent. The new page displays the contents without covering up the background of the page that contans the Frame control. If you would rather change the background color you can do that in the Appearance properties. For this example, leave the background transparent.
3 With the Green.xaml page still forward, click and drag the GreenMonsta.png file out onto the artboard.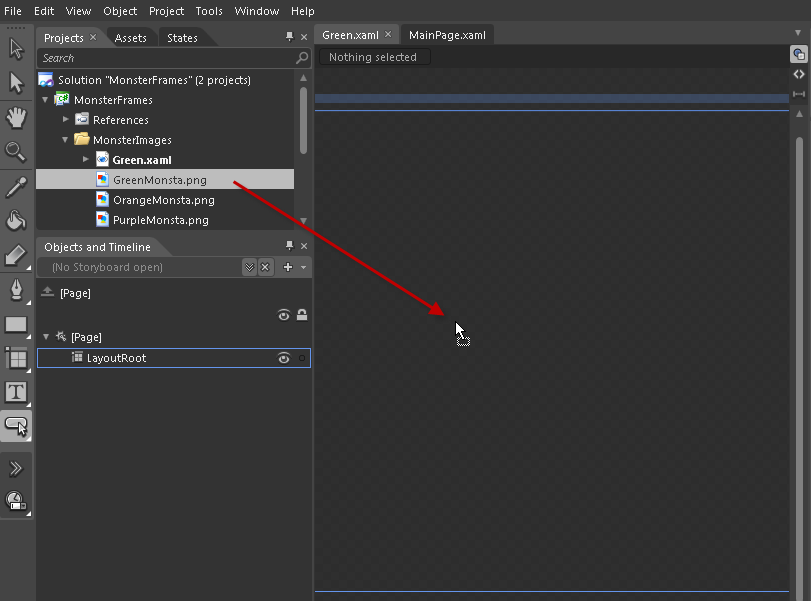
4 Use the Selection tool (top of Tools panel) to position the monster image visually on the center of the page. Choose File > Save.
5 With the MonsterFrames folder still selected in the Projects panel, select File > New Item again. When the New Item window appears select Page, name the page Orange.xaml, and then press OK.
6 With the Orange.xaml page still forward, click and drag the OrangeMonsta.png file out onto the artboard.
7 Use the Selection tool (top of Tools panel) to position the monster image visually on the center of the page. Choose File > Save.
8 One more time! With the MonsterFrames folder still selected in the Projects panel, select File > New Item again. When the New Item window appears select Page, name the page Purple.xaml, and then press OK.
9 With the Purple.xaml page still forward, click and drag the PurpleMonsta.png file out onto the artboard.
10 Use the Selection tool (top of Tools panel) to position the monster image visually on the center of the page. Choose File > Save All.
Creating a default page
You still have yet to add the Frame control, but you will continue to set-up the assets that you need to put the Frame control into action. In this next section, you create an page that will appear as the default screen in a Frame.
1 With the MonsterFrames folder still selected in the Projects panel, select File > New Item. When the New Item window appears select Page, name the page Default.xaml, and then press OK.
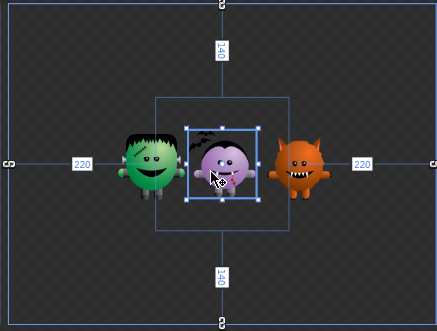
2 With the Default.xaml page still forward, click and drag each one of the moster images out onto the artboard.
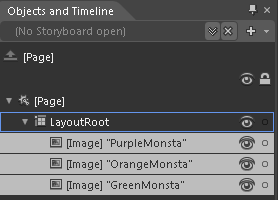
3 Leave the images wherever they land and then in the Objects and timeline panel select the top monster image and then Shift+click on the bottom monster image, selecting all three.
4 Locate the Layout pane in the Properties panel and type 200 in both the Width and Height textboxes.
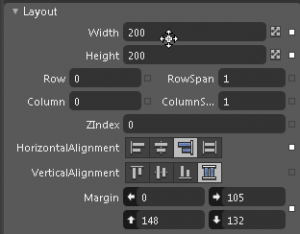
5 Use the Selection tool (top of Tools panel) to position the each monster image horizontally on the page. This does not have to be exact.
6 Select all the images in the Objects and Timeline panel, and then Right+click on any one of them and select Group Into > StackPanel. The images are put in a StackPanel. The Stackpanel defaults to vertical, as that is the way that you positioned the objects. This orientation property can be changed in the Layout pane of the Properties panel.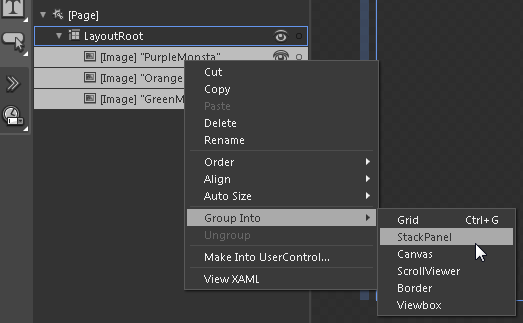
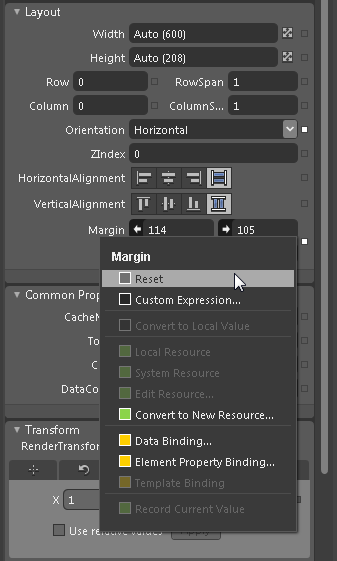
7 If the images do not fit correctly, locate the small button to the right of Margins in the Layout pane and click and hold on it. Select Reset. Choose File > Save. You are now ready to add the frame top the MainPage.xaml.
Adding the Frame control to the Main page.
In this section you will add the Frame to the main page, as well as three buttons that can be used to navigate from one page to another. First, you will locate the Frame control and add it to your page.
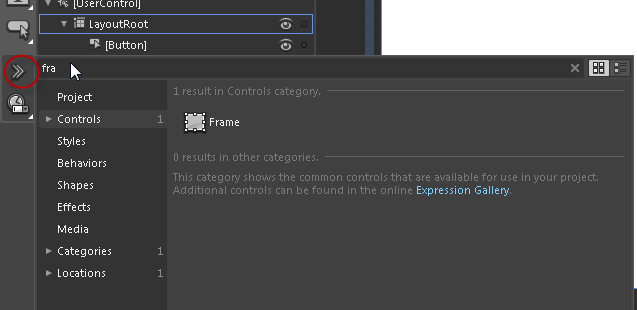
- Click on the Assets button at the bottom of the Tools panel and type FR into the Search textbox at the top of the window that appears. Frame shows up in the Results list. Select Frame.
2. Click and drag the Frame control on your artboard. Remember that you must make this the appropriate size so that it can accommodate the pages you create. Since we left the pages full-size, you will want to make your frame as large as possible without covering up your buttons.
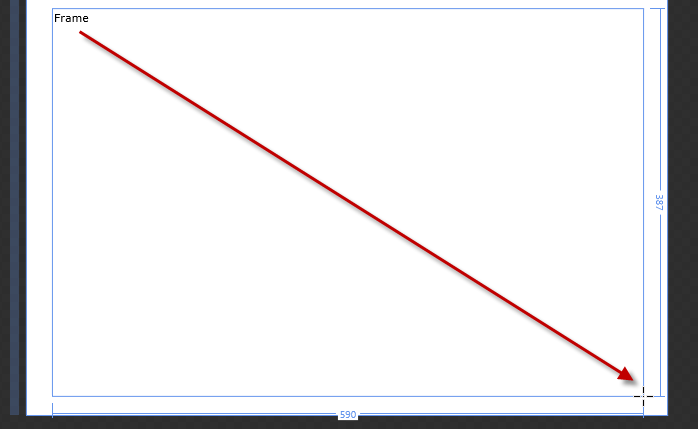
It is important that you name this frame, otherwise the navigation will not work. In the Properties panel the name to MonsterPages.
4. With the Frame still selected locate the Common Properties pane and change the Source to Default.xaml.
Creating Hyperlink Buttons
- You will now create a rectangle to be used as a Hyperlink button.
- Select a Rectangle from the Tools panel and click and drag out a rectangle. Using the Layout panel in the Properties panel change the size to approximately 75 wide x 25 high. You can enter these values in the Layout panel int the Width and Height textboxes.
- Change the rectangle to a light grey color so that you can see it easier.
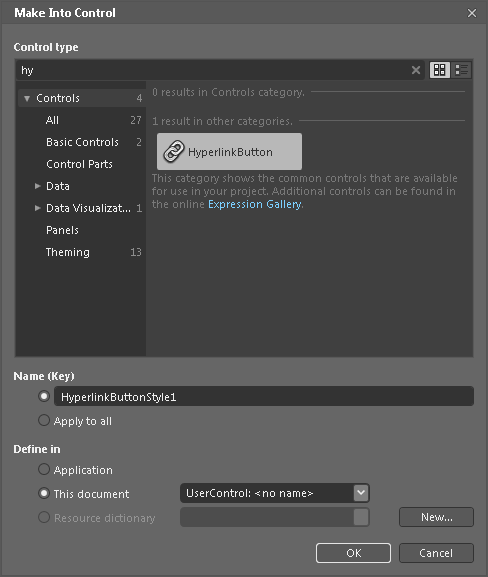
- Right-click on the rectangle and select Make Into Control. When the Make Into Control window appears type Hy into the Search textbox. Select HyperlinkButton and press OK. You are now in the template for the HyperlinkButton.
5. You will not be editing this template, so simply click on the Return to scope arrow at the top of the Objects and Timeline panel.
6. With the Hyperlink button still selected change the Content text in the Common Properties pane to Green.
7. Click on the Navigate Uri textbox and select Green.xaml.
8. Click on the Target Icon to the right of TargetName and then click anywhere on your frame.
9. Return to the Selection tool and hold down your Alt key. Click and drag the HyperlinkButton to the right. By holding down the Alt key and dragging an object you can clone it in Expression Blend. In this next button, change the content to Orange, and change the NavigateUri to Orange.xaml.
10. Clone the Orange button and change the Content to Purple, and the Navigate Uri to Purple.xaml.
If you want these buttons to align and distribute you could group them into a StackPanel, for this practice they will just stay where they are.
Test your project! Press F5 to run your project and test your buttons.


Great tutorial, thank you! Well written and very clear. I wish they were all like this. Question for you. Is there a work around for the hyperlink buttons to call the pages into the frame in a standalone WPF application? I’ve checked out http://tinyurl.com/6sd6vkz but I would like my navigation to overlay the pages that are being pulled in vs having it in each individual page.
Thanks in advance,
Eric
OK, I think I have it figured out using the ChangePropertyAction attached to a button with slight modification to the xaml. PropertyName=”Source” Value=”/pagename.xaml